Faux Granite Countertop

My office (aka library, aka music room) has great floor to ceiling bookshelves covering one wall, space for our upright piano & the kids’ music instruments, and a window overlooking our front garden. Unfortunately it also has a big, ugly cream colored laminate counter as the desk top – complete with a large chip in the front! Replacing the top with a granite top would cost a minimum of $600, so that’s not going to happen. I figured I had nothing to lose, so here’s a glimpse at the start of the project (priming, base coat, and some practice getting the granite look how I think I want it). More complete post & results coming in the next few days.

faux granite | studiojcreations.com

faux granite | studiojcreations.com

faux granite | studiojcreations.com

faux granite | studiojcreations.com

faux granite | studiojcreations.com

“Framed Love” Paper Pumpkin Kit Re-do

The Stampin’ Up! Mother’s Day Paper Pumpkin kit is cute, but I must admit that I wasn’t thrilled with it. I didn’t want to give essentially a framed card as a gift. Plus I felt that I should be able to get more out of the kit than the frame gift, some tags, and a few extra pieces; so I set out to do just that!

20140507-163250.jpg

I used the kit above to get all of this…

Framed Love Kit Re-do | studiojcreations.com

Here’s how:

The kit comes with all the supplies (except scissors & basic adhesive) to create the projects, so I added very little.

Framed Love Kit Re-do | studiojcreations.com
I added two 12×12″ pieces of paper (I used Coastal Cabana and Baked Brown Sugar, but you could use any coordinating colors) and a 4×6″ white piece.

Framed Love Kit Re-do | studiojcreations.com
I cut the Coastal Cabana card stock (shown above) into two 5×10″ pieces that will become 5×5″ folded cards. The extra strips will also be used. I cut the Baked Brown Sugar into eight 3×6″ pieces that will become 3×3″ folded gift cards. The white is cut into a 4″ square; the extra will also be used.

Framed Love Kit Re-do | studiojcreations.com
Even though the kit only contains one frame, it makes two of the inside art pieces (except for another white 4×4″ piece that I added). I made those according to the kit instructions and adhered them each to the front of the 5×5″ cards. I inked “for you” inside and also used the large hearts that are extra kit pieces.

Framed Love Kit Re-do | studiojcreations.com
I used the frame for a picture and the extra white paper to add some images from the kit to the frame. I made the gift wrap for the frame as shown in the kit.
I finished by making all the tags (the kit includes supplies for 12) and adhering 8 of them to the 3×3″ gift cards. (This is where I added the leftover Coastal Cabana strips.)

Framed Love Kit Re-do | studiojcreations.com
I love that by adding two 12×12″ pieces of colored card stock & a piece of white from my scrap paper bin, I was able to do all this!
If you want to know more about Paper Pumpkin Kits, comment here or visit my demonstrator website. http://www.studioj.stampinup.net

Paper Banner Tutorial

Paper Banner Tutorial | studiojcreations.com

I’m finishing up bridal shower decorations today, so I thought I’d share a quick tutorial showing how to use 12×12 paper to make an easy paper banner.

Paper Banner Tutorial | studiojcreations.com
Supplies:
12×12 paper
Paper cutter (or ruler & scissors)
Ribbon
Sewing machine (or strong adhesive if you prefer not to sew)
Banner decoration (letters, shapes, etc) to fit your theme

Paper Banner Tutorial | studiojcreations.com
Cut 12×12 paper in half

Paper Banner Tutorial | studiojcreations.com
The banner pieces will be 4″ wide at the top & 6″ tall. Make small marks on the edges of your paper at 4″ & 8″ on one side and 2″, 6″, & 10″. Either draw a zigzag line with a ruler between the marks & cut, or line up the marks on the blade of your paper cutter & cut each piece. You will end up with 5 banner pieces & 2 small waste pieces as shown above. Each 12×12 piece of paper will make 10 banner pieces, so for my banner, I only needed 2 pieces of cardstock.

Paper Banner Tutorial | studiojcreations.com
After adding my decorations to the front, I sewed the pieces onto a length of 1/2″ grosgrain ribbon.

Paper Banner Tutorial | studiojcreations.com
I finished the banner by sewing a skinny coordinating ribbon on the front.
The entire banner, including cutting out circles & letters with my Big Shot, took under an hour.

Paper Banner Tutorial | studiojcreations.com

Circle Decorations

Circle Decorations | studiojcreations.com

I’m working on decorations this week for my friend’s bridal shower. I LOVE how fast & easy these are to make.
Step 1: Punch different sized circles (if paper is single sided, punch 2 & lay back-to-back). I made seven strands. Each strand was about 3 feet long & had about 20 double sided circles.
Step 2: Line circles up in desired order or pattern (or simply random).
Step 3: Sew the circles in a strand using a sewing machine. In between the circles I left the presser foot down for a few seconds to make space. Just sew & feed in circles – it’s really quite fun! DO NOT back stitch at all; instead tie a knot in the thread on both ends of the strand after you have sewn the circles together.
That’s it! Check back tomorrow to see more shower decorations in progress.

Circle Decorations | studiojcreations.com

Circle Decorations | studiojcreations.com

Circle Decorations | studiojcreations.com

Sweet Sorbet Card

Sweet Sorbet Card | studiojcreations

Sweet Sorbet card using crisp cantaloupe and summer starfruit cardstock, Sweet Sorbet paper, Sweet Sorbet accessory pack, and Petite Pairs stamp set. The envelope (final photo) uses the Petal Parade stamp set.

Sweet Sorbet Card | studiojcreations

Sweet Sorbet Card | studiojcreations

Sweet Sorbet Card | studiojcreations

Sweet Sorbet Card | studiojcreations

Have fun creating!

(Petal Parade stamps, Sweet Sorbet accessories and paper available only through March 31, 2014, during Sale-A-Bration. Click the Stampin’ Up! logo to the right to see products and promotions.)

Ombré Card Tutorial

Ombré Card Tutorial | studiojcreations

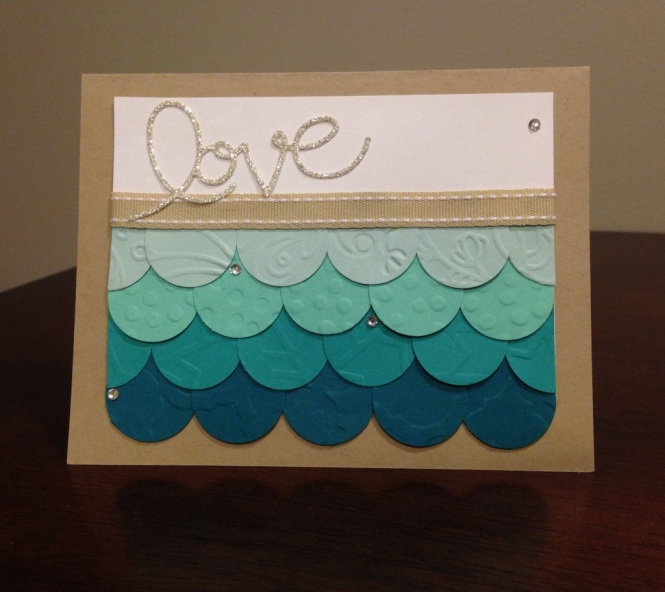
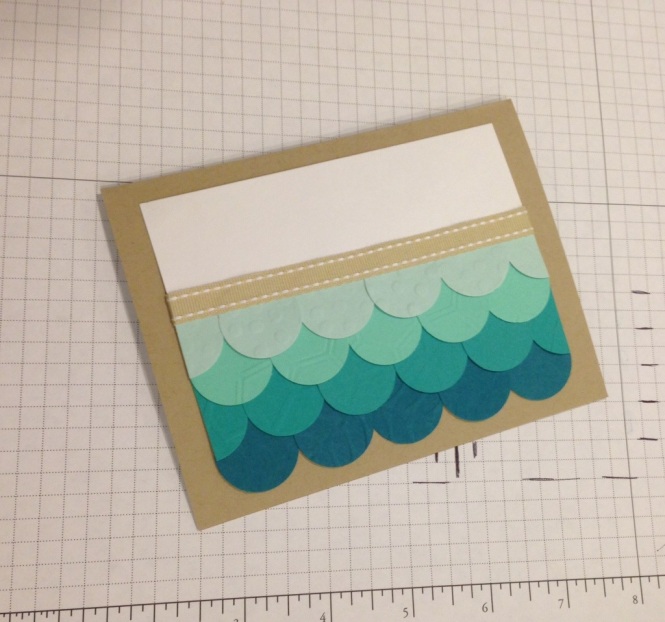
I love how this card came together! I copied the look of the card Stampin’ Up! posted on their facebook page here, but instead of the connected rows of scallops I liked the individual textured circles like on this card on Pinterest. I combined the two and created this tutorial for a stamp club meeting I had this week. Try it yourself with this or a completely different color combination!

Ombré Card Tutorial | studiojcreations

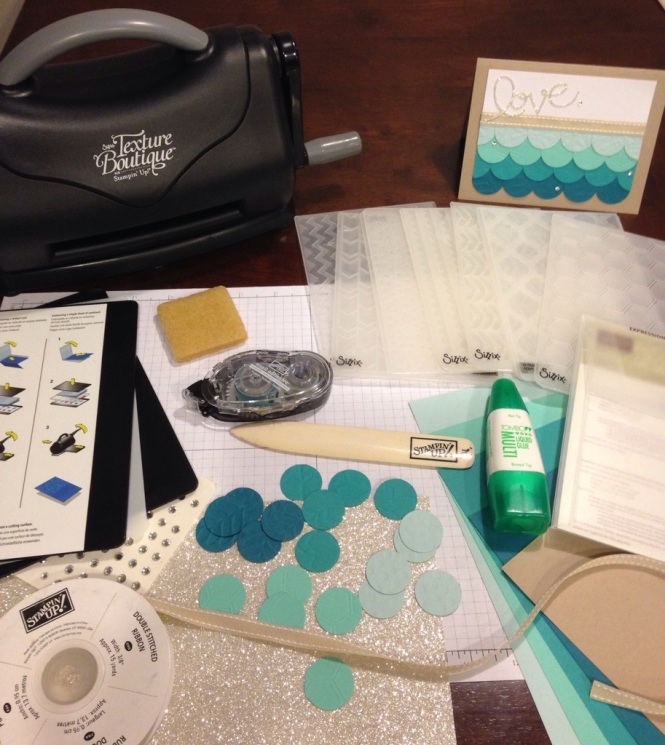
Here are most of the supplies I used. Mainly you need a half sheet of 8.5×11 cardstock for the card itself (I used baked brown sugar), four colors for the circles (I used soft sky, coastal cabana, bermuda bay, and island indigo punched with a 1″ circle punch), a 3.25×4.75 piece of white paper, and ribbon for the top. If you want textured circles you’ll need a Big Shot or Texture Boutique. For the word on the top, you could stamp a word or do what I did and use the Big Shot to cut out a thinlits word on glimmer paper. Rhinestone or pearl embellishments are an optional but fun way to finish the card! (If interested, you can click on the Stampin’ Up! logo on the right to find products.)

Ombré Card Tutorial | studiojcreations

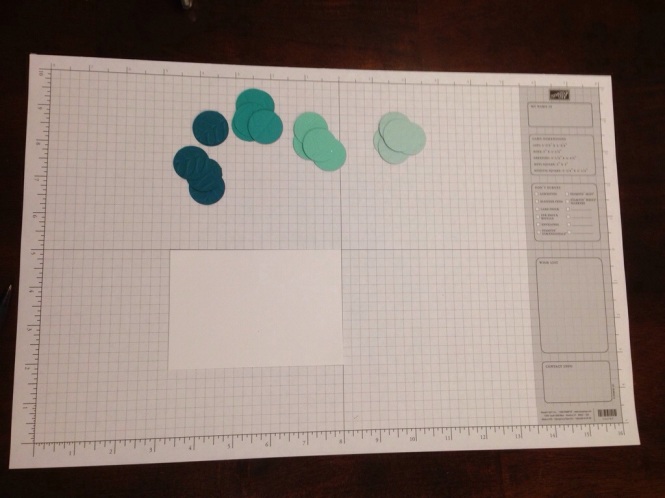
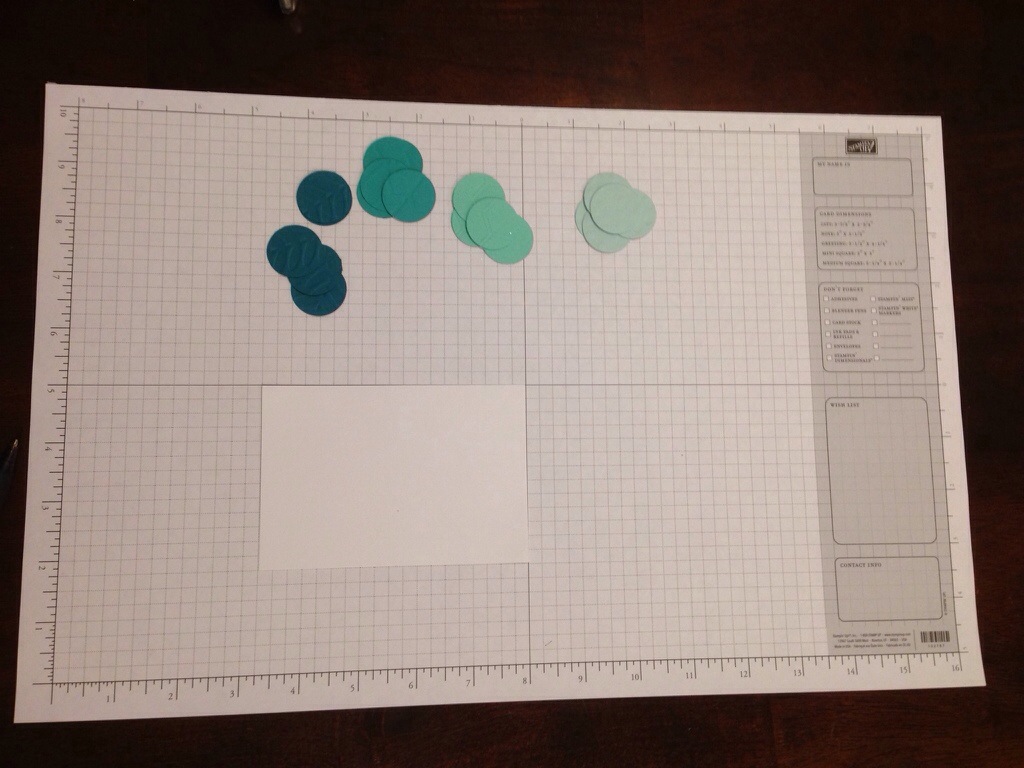
First I used the Texture Boutique to texture a 1/4 sheet of cardstock in each of the four colors and punched out five 1″ circles from each color. Next I needed to lay out the circles on the white paper, overlapping the bottom edge by 1/2″. My first attempt to get the circles straight was a disaster, so I grabbed a piece of my grid paper and it was much easier…

Ombré Card Tutorial | studiojcreations

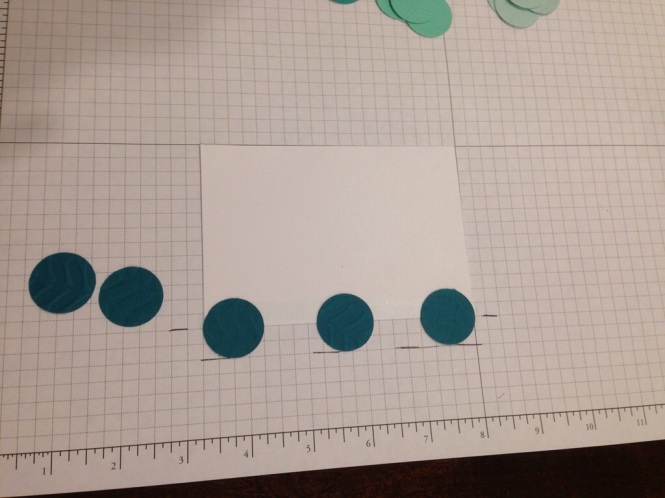
A small strip of adhesive held the paper in place. I made dashes that marked the bottom of the cardstock as well as 1/2″ below to get the bottom row straight. It’s easiest to place the left, right, and center circles before the other two. Each circle will overlap the one beside it slightly but not much.

20140321-170439.jpg

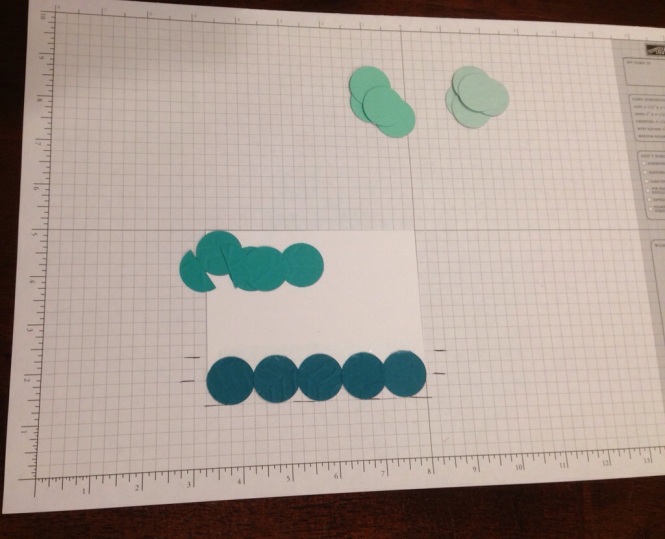
For the second row of circles, you’ll want to mark 1/2″ above the last mark to find the horizontal center of the next row. Run a strip of adhesive along the top of the first row of circles. You want it to be right on the line you just marked. Cut one of the circles in half so the circles offset each other (see next picture).

Ombré Card Tutorial | studiojcreations

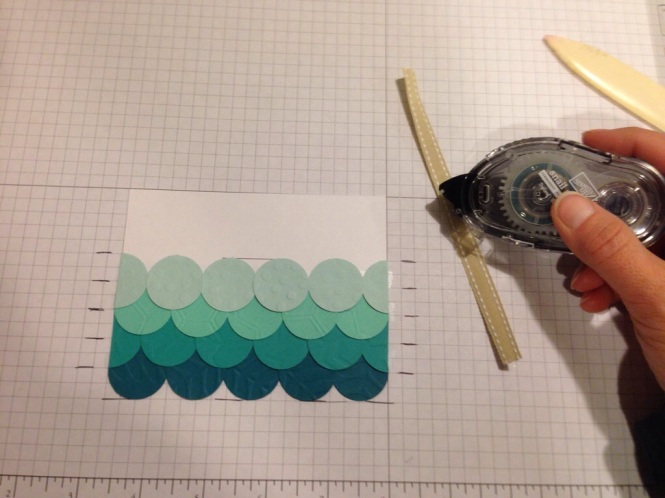
Continue marking each row as you move up. It also helps to mark where the top of the circles should align. Five full circles make up the third row, but cut a circle in half again for the ends of the fourth row. When you finish the top row, put adhesive on the back of the ribbon.

Ombré Card Tutorial | studiojcreations

Line the top of the ribbon up with the tops of the circles; wrap the ends of the ribbon around the back of the white cardstock. Adhere the white piece to the card base.

Ombré Card Tutorial | studiojcreations

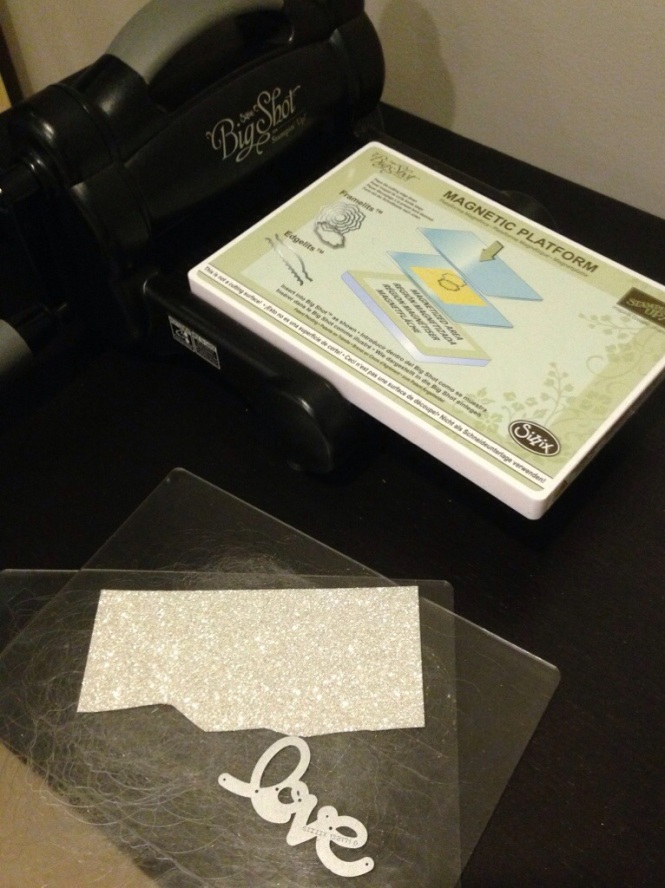
I used the Big Shot to cut out “love” from the expressions thinlits dies from the Holiday Stampin’ Up! catalog. Unfortunately this is a discontinued item. I didn’t realize that when I grabbed it to use on this card; I’m really hoping Stampin’ Up! will include it  or something similar in the 2014-2015 catalog (I can’t find anything similar anywhere else). The glimmer paper is great to work with. It cuts almost as easily as cardstock. The back is a thin plastic and the glitter stays on it very well instead of falling off everywhere.

Ombré Card Tutorial | studiojcreations

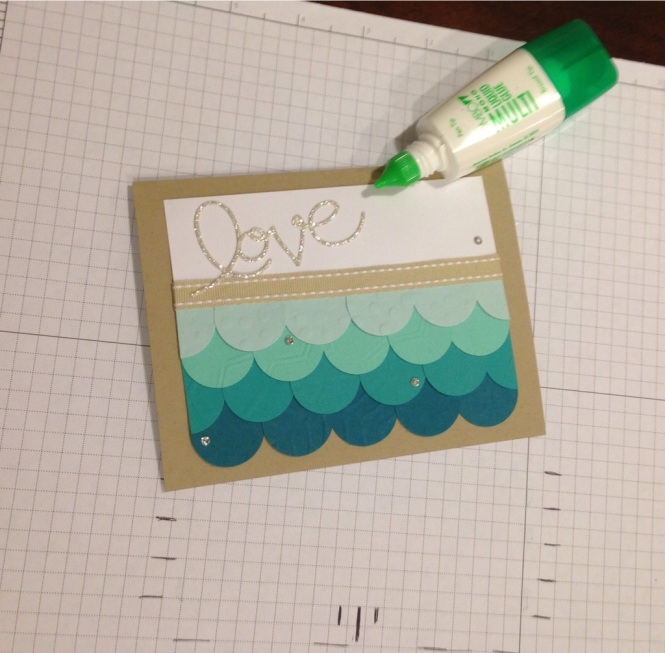
I used the small end of the two way glue to stick on the word and finished the card with some basic rhinestones.

Ombré Card Tutorial | studiojcreations

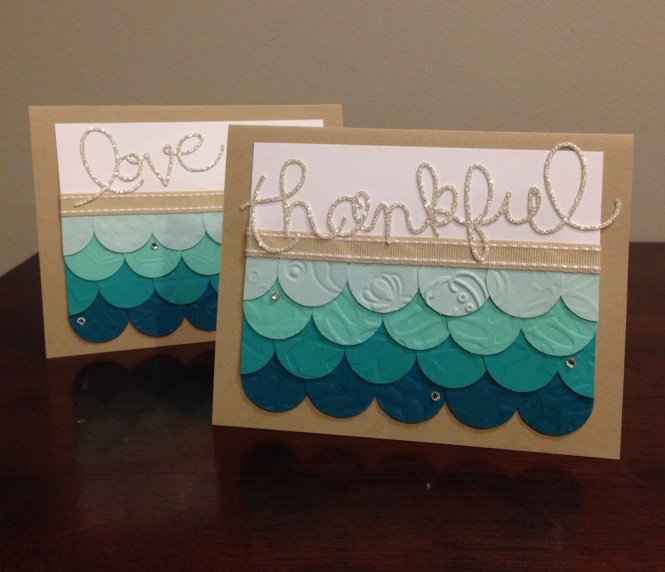
Thanks for reading! Have fun making your own!

Burlap & Tulle Wreath

Burlap & Tulle Wreath | Studio j Creations

Here’s how I made a quick & easy wreath using some simple supplies. I started by using floral wire to wire the burlap in 18 in sections to the perpendicular wreath supports. (This keeps the burlap from sliding around.)

Burlap & Tulle Wreath | Studio j Creations

Burlap & Tulle Wreath | Studio j Creations

Next I found the center of each 18 inch section & wired it to the frame. Since these aren’t wired to the supports, I could slide it a little to adjust the look of it.

Burlap & Tulle Wreath | Studio j Creations

Burlap & Tulle Wreath | Studio j Creations

In between each burlap section, I used hot glue to secure brown & tan strips of tulle. Because the tulle is so thin, I was able to glue the strips together in between each section. After every section was glued in place, I adjusted the tulle around the burlap.

Burlap & Tulle Wreath | Studio j Creations

I ran a length of floral wire behind each of 3 silk & burlap flowers and wired them to the wreath to finish the look.

Burlap & Tulle Wreath | Studio j Creations

Burlap & Tulle Wreath | Studio j Creations

A new spring wreath in less than an hour!

(All products came from Hobby Lobby except the tulle which is on clearance from Stampin’ Up! while supplies last.)